Detailed how to on P# Scripts
Training Program: Introduction to P#
Context
Each P# script consists of a Context and one Table definition. The Context defines a list of entities, a time range and time increment to be applied in the P# script. The Table definition has one or more Column definitions, which can be data or calculations.
A Context consists of the following parts:
- Entity Set - a list of entities, defined below the Context inside the P# script, or from a previously defined Entity Set via P# Snippets
- Scope - a time frame, with a start and end date, defined below the context definition inside the P# script, or from a previously defined Scope via P# Snippets
- Optional: Hierarchy
If a hierarchy is specified, aggregations are performed according to this hierarchy.
The context element references an entity set and a scope. If an Entity Set or a Scope with that name already exists as a P# Snippet, they can be referenced in the Context definition and there is no need to define them again. Assuming there are P# Snippets that define an Entity Set called "Entities of Interest" and a Scope called "Time range of Interest", the following context definition is sufficient:
Context "Your Context Name"        // name your context here
    Entity Set "List of Entities"  // name your list of entities here
    Scope "Time Range of Interest" // name your scope here
End Context
Generally, it is recommended to use recurrent standard entity sets and scopes as P# Snippets to ensure consistent scripts. However, if you want to use your own custom Entity Set and/or Scope in a particular P# script, you can embed them into your P# script below the Context definition:
Entity Set "Entities of Interest"
    HasEntityType("Well")
End Set

Scope "Time range of Interest"
    Between #04/01/2015#                        //This is a comment
    And toEnd()
    Step EveryFifteenMinutes
End Scope

//This is the end of the script initialization part
To comment a line of the script out, just put // in front of it or select one or more lines and click Comment (or Ctrl+K). Commented lines are highlighted green. To uncomment lines, select one or more lines and click Uncomment (Ctrl+U).
Calculations
In P# syntax, key words are highlighted in dark blue, functions in light blue, strings in red, and comments in green.
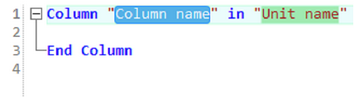
Calculations are performed using columns, which are grouped in tables. It is recommended to use a column for each calculation step to keep overview. You can have as many columns in your table as you like. P# uses predefined signal names and units, which are stored in a dictionary. The dictionary covers the most common petroleum engineering related signals and units, but can be customized to meet your needs. Signals and units are placed between quotation marks. You can use mathematical and logical operators. Beyond that, P# offers a variety of mathematical, statistical, filtering and petroleum engineering related functions.
Table "Table 1"
    Column "qo pti" in "m3"
        "oil production per time increment" in "m3"
    End Column

   Column "time on production" in "d"
        "time on production" in "d"
    End Column

   Column "qo daily" in "m3/d"
        Column "qo pti" in "m3"/Column "time on production" in "d"
    End Column
End Table
The above created “Table 1” consists of three columns. The first column loads the “oil production per time increment” signal in “m3” into a column called “qo pti”. The second column loads the “time on production” signal in “d”. The third column divides the first column by the second and calls the result “qo daily” in “m3/d”. Since columns are addressed, the term Column needs to be used.
If a calculation uses columns that were defined in another table, the terms Input and Input Column need to be used in the definition of table and columns:
Table "Table 1"
    Column "qo pti" in "m3"
        "oil production per time increment" in "m3"
    End Column

   Column "time on production" in "d"        //displayed name and unit
        "time on production" in "d"        // loaded signal and unit
    End Column

End Table

Table "Table 2" Input "Table 1"

   Column "qo daily" in "m3/d"
        Input Column "qo pti" in "m3"/Input Column "time on production" in "d"
    End Column
End Table
Create Event Tags
To create a tag if a certain event is noticed, rules can be written. Tag names need to be created in the Tag Editor (Tag tile in PetroVisor Client Tool) first, then they can be used in a script. The following example would create a tag called "High ESP Frequency" if the signal "esp frequency" exceeds the given threshold.
Rule "Name of your rule"
    Event "High ESP Frequency"
    //condition for an event
        "esp frequency" in "Hz" > 50
    End Event
End Rule
These tags are used for event detection and prediction workflows.
P# Snippets
To ease and increase speed of scripting, P# snippets can be used. They can be accessed via the P# icon on the right side of the P# editor. P# snippets are text modules of most widely used functionalities, which can be continuously expanded (Extract function in P# snippet window).
Key words like Context, Entity Set, Scope, Table or Column automatically insert snippets when TAB is pressed after the last character of the keyword.
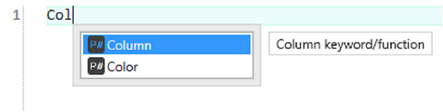
PetroVisor suggests available keywords/functions when typing

Snippet example: column
P# Functions
P# contains mathematical, logical, statistical functions that are well-suited for petroleum engineering methods. Also, moving window functions, data filtering functions and neighborhood functions are available.
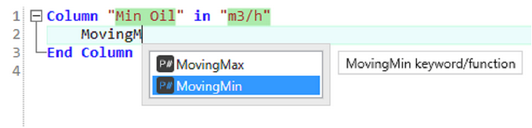
As soon as you type '(', the insight window appears and shows information about this function, e.g. a short description and the function's input parameters.

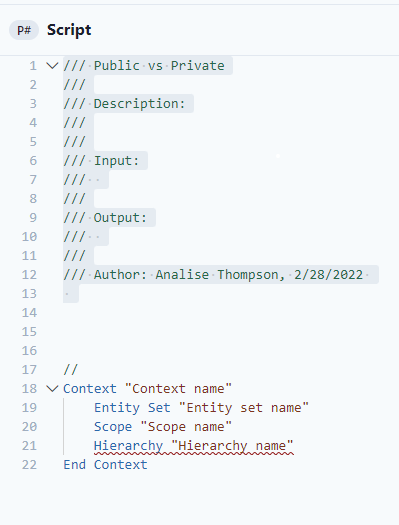
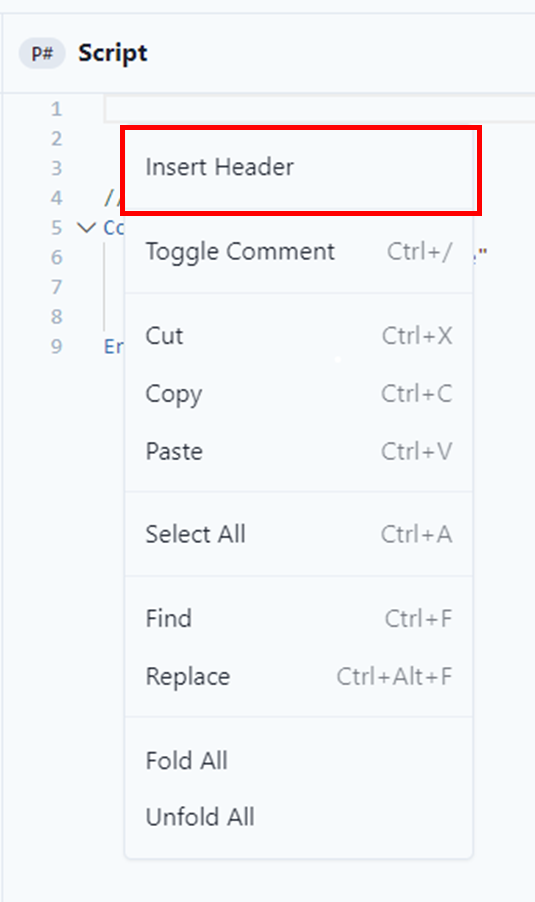
P# Heading
The heading in the P# scripts contains important information about that specific script. It contains the purpose, Inputs, Outputs, Author, and last update. The header will automatically populate Placeholders for Inputs / Outputs based on the code. The user has to right click and select "Insert Header."
The header will look like the example below: